Below is a step-by-step guide to onboarding your Properties and data Connections. These are the first 6 steps to successful onboarding.
Step 1: Add a Property (Required)
This step is required to make properties available for adding attributes, and PMS instance and data connection information. Attributes enable portfolio filtering, and data connections populate grids and charts with data you need for analysis and reporting.
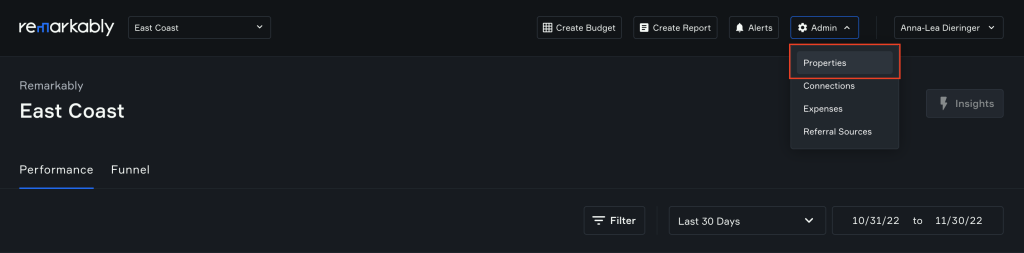
- Click on the ‘Admin’ button at the top right of the webapp. If you can’t see it, you may need to clear your cache, or ensure you have Admin permissions.
- Select ‘Properties’ from the Admin menu, and navigate to the ‘Admin: Properties’ section and ‘Properties’ tab.
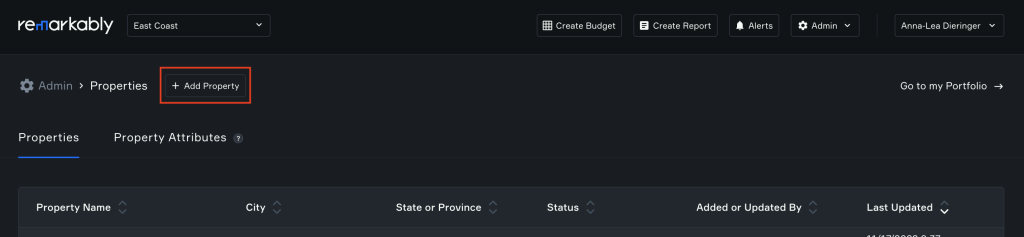
- In the ‘Properties’ tab, if you already have properties on Remarkably, you may see a grid containing a list of properties you have Admin access to. If not, it’s time to add one!
- To add a new property to Remarkably, make sure you’re still on the ‘Properties’ tab, then click the ‘Add Property’ button.
- A form will launch to capture required property information, including the property name, address, and billing email address. Click ‘Save’ once you’re done here.
- Once you’ve saved your new property information, you’ll see the property information listed in the ‘Properties’ grid.
- If you need to make a change to your new entry (or any property), you can click on the three dots at the far right of the property row, which will then display the contextual menu. Select ‘Edit Property Information’ from the menu. This will launch your form, and you can make changes as required and save them.
Learn more about adding, editing and deactivating properties here.
Step 2: Add Property Attributes (Optional)
This step is optional, but required for users to filter portfolios by these attributes. For example, if you need to filter your portfolio by city, stage, or owner, you should add attributes so you can do that.
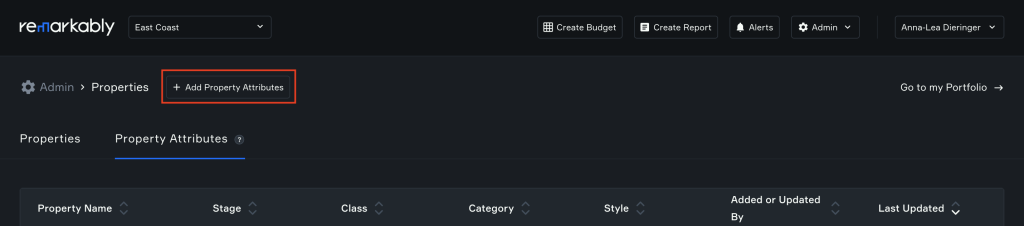
- In the same ‘Admin: Properties’ section, click on the ‘Property Attributes’ tab. (If you’re not in the ‘Admin: Properties’ section, you’ll first need to click on the ‘Admin’ button at the top right of the webapp, and select ‘Properties’ from the menu.). More details above.
- In the ‘Property Attributes’ tab, if you already have properties on Remarkably, you may see a grid containing a list of properties you have Admin access to. If not, it’s time to add one! See above.
- To add property attributes to properties, make sure you’re still on the ‘Property Attributes’ tab, then click the ‘Add Property Attributes’ button (at the top of the Properties section).
- A form will launch to capture attributes, including the property you want to add attributes to, and the stage, class, category and style options. You can also add unique attributes, such as owner name, year built, and website URL. You can fill in as little or as much as you want and need in the form. Click ‘Save’ once you’re done here.
- Once you’ve saved your new property attributes, you’ll see the property attributes listed in the ‘Property Attributes’ grid.
- If you need to make a change to your new entry (or any property), you can click on the three dots at the far right of the property row, which will then display the contextual menu. Select ‘Edit Property Attributes’ from the menu. This will launch your form, and you can make changes as required and save them.
Learn more about adding and editing attributes here.
Step 3: Add PMS Instance(s) (Required)
This step is required for users to connect their properties to their PMS, and ingest PMS data for property marketing analysis and reporting in Remarkably. PMS instances are added separately from property-specific connections, to enable multiple properties to leverage shared PMS instance information and avoid redundant data entry.
- Click on the ‘Admin’ button at the top right of the webapp. If you can’t see it, you may need to clear your cache, or ensure you have Admin permissions.
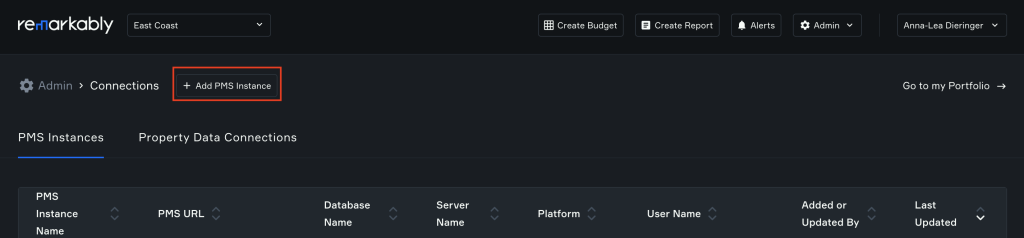
- Select ‘Connections’ from the Admin menu, and navigate to the ‘Admin: Connections’ section and ‘PMS Instances’ tab.
- In the ‘PMS Instances’ tab, if you already have properties on Remarkably, you may see a grid containing a list of PMS instances you have Admin access to. If not, it’s time to add one!
- To add a PMS instance, make sure you’re still on the ‘PMS Instance’ tab, then click the ‘Add PMS Instance’ button (at the top of the Connections section).
- A form will launch to capture PMS instance information, including the name you’d like to use for it, URL, database name, server name, platform, user name and credentials. Once you’re done entering the instance details, click ‘Save’.
- Once you’ve saved your new instance details, you’ll see the instance listed in the ‘PMS Instances’ grid.
- If you need to make a change to your new entry (or any instance already entered), you can click on the three dots at the far right of the instance row, which will then display the contextual menu. Select ‘Edit PMS Instance’ from the menu. This will launch your form, and you can make changes as required and save them.
Step 4: Add Property PMS Data Connection (Required)
This step is also required for users to connect their properties to their PMS, and ingest PMS data for property marketing analysis and reporting in Remarkably. This is your second-to-last step in getting your PMS and Google Analytics data pulled into Remarkably!
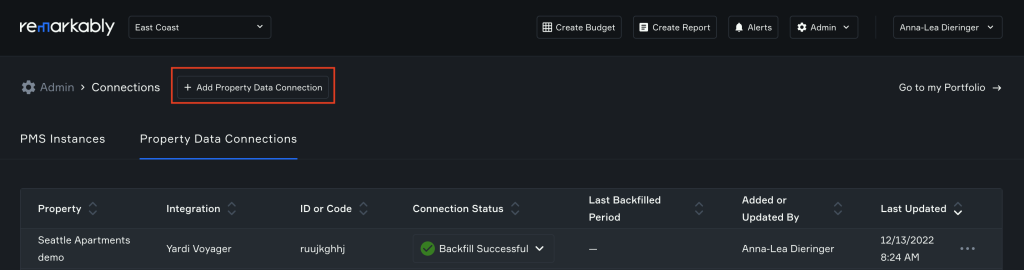
- In the same ‘Admin: Connections’ section, click on the ‘Property Data Connections’ tab. (If you’re not in the ‘Admin: Connections’ section, you’ll first need to click on the ‘Admin’ button at the top right of the webapp, and select ‘Connections’ from the menu.). More details above.
- In the ‘Property Data Connections’ tab, if you already have a PMS instance added to Remarkably, you may see a grid containing a list of PMS data connections you have Admin access to. If not, it’s time to add one! (You may also see Google Analytics data connections you have access to; see below for details on adding those connections.)
- To add a PMS data connection, make sure you’re still on the ‘Property Data Connections’ tab, then click the ‘Add Property Data Connection’ button (at the top of the Connections section).
- A form will launch to capture property data connection information, starting with the property you want to connect data for. If there’s no property available to select, you’ll need to add a property (see Step 1, at the top of this article).
- Then, in that same form, select the integration type you’d like to connect with: here, you want to select ‘Yardi Voyager’, and then select the instance this property relates to. If there’s no instance available to select, you’ll need to add an instance (see Step 3, above).
- Then, in that same form, you’ll be asked to confirm you have followed a few setup details in Yardi Voyager itself. Correct setup in Yardi Voyager is critical to a successful PMS connection in Remarkably.
- Lastly, in that same form, you’ll need to enter the property’s unique Yardi Voyager property code.
- Once you’re done entering the Yardi Voyager data connection details, click ‘Save and Test’.
- Once you’ve saved your new data connection details, you’ll see the property-specific Yardi Voyager connection in ‘Testing…’ status in the ‘Property Data Connections’ grid.
- Once testing has completed, you’ll see status change to a successful or unsuccessful result. You can review your options in the status button drop-down menu, such as trying again. If the test fails, you may want to double-check your PMS instance and/or property data connection details, make edits as required, and save those changes, then re-test the connection. If you need to make a change to your new entry (or any connection already entered), you can click on the three dots at the far right of the instance row, which will then display the contextual menu. Select ‘Edit Property Data Connection’ from the menu. This will launch your form, and you can make changes as required and save them.
Step 5: Add Property Google Analytics Connection (Required)
This step is also required for users to connect their properties to their Google Analytics account, and ingest property website data for property marketing analysis and reporting in Remarkably. This is your last step in getting your PMS and Google Analytics data pulled into Remarkably!
- In the same ‘Admin: Connections’ section, click on the ‘Property Data Connections’ tab. (If you’re not in the ‘Admin: Connections’ section, you’ll first need to click on the ‘Admin’ button at the top right of the webapp, and select ‘Connections’ from the menu.). More details above.
- In the ‘Property Data Connections’ tab, you may see property-specific Google Analytics data connections you have Admin access to; if not, it’s time to add one!
- To add a Google Analytics data connection, make sure you’re still on the ‘Property Data Connections’ tab, then click the ‘Add Property Data Connection’ button (at the top of the Connections section).
- A form will launch to capture property data connection information, starting with the property you want to connect data for. If there’s no property available to select, you’ll need to add a property (see Step 1, at the top of this article).
- Then, in that same form, select the integration type you’d like to connect with: here, you want to select ‘Google Analytics’, and then select the version this property is using.
- Then, in that same form, you’ll be asked to confirm you have followed a few setup details in Google Analytics itself. Correct setup in Google Analytics is critical to a successful website connection in Remarkably.
- Lastly, in that same form, you’ll need to enter the property’s unique Google Analytics ID.
- Once you’re done entering the Google Analytics data connection details, click ‘Save and Test’.
- Once you’ve saved your new data connection details, you’ll see the property-specific Google Analytics connection in ‘Testing…’ status in the ‘Property Data Connections’ grid.
- Once testing has completed, you’ll see status change to a successful or unsuccessful result. You can review your options in the status button drop-down menu, such as trying again. If the test fails, you may want to double-check your Google Analytics property data connection details, make edits as required, and save those changes, then re-test the connection. If you need to make a change to your new entry (or any connection already entered), you can click on the three dots at the far right of the connection row, which will then display the contextual menu. Select ‘Edit Property Data Connection’ from the menu. This will launch your form, and you can make changes as required and save them.
Once you’ve added your new property information, attributes, PMS instance, and PMS and Google Analytics data connection details, you can navigate to your portfolio to see your new property! Please note: It may take 24-48 hours for your data connections to fully populate all KPIs in Remarkably from the connection date forward.
Keen to backfill historical data? See below!
Step 6: Backfill Property PMS and/or Google Analytics Data (Optional)
This step is optional for users, but offers historical trend insight. You can backfill historical Yardi Voyager and Google Analytics data using existing connection details and a successfully tested connection.
- In the same ‘Admin: Connections’ section and ‘Property Data Connections’ tab, you will see a ‘Test Successful’ status button associated with successful data connections for properties. (If you’re not in the ‘Admin: Connections’ section, you’ll first need to click on the ‘Admin’ button at the top right of the webapp, and select ‘Connections’ from the menu.).
- One option available to successfully tested data connections is to ‘Backfill’ data for that property and connection. Users can backfill up to one month at a time, back to January 1, 2022. Learn more.